

Create conda recipes with Grayskull
Master the Conda Universe

We recently posted about the dangers of using the conda defaults channels, and anaconda distributions. The biggest challenge in moving away from anaconda is that some packages aren’t available via alternative channels. Creating and sharing conda recipes can be intimidating, but in this post we’ll show you how to use Grayskull to quickly and reliably generate conda recipes for python packages that can then be contributed to conda-forge or elsewhere.

Making bioinformatics tools widely available is one of the most important and sometimes frustrating tasks a bioinformatician can undertake. Conda enables users to install a wide variety of tools, and their dependencies, into a managed environment. The conda process relies on community-contributed recipes that specify how to package and install these tools and their dependencies. Creating a recipe can be a tediously manual process, taking many iterations to get right, especially when supporting Linux, Mac, and Windows environments. Fortunately, for Python projects already published to the python package index (pypi), this is easy with grayskull.
Two main package indexes (called channels), which store and index bioinformatic tools and general purpose software are bioconda and conda-forge respectively. Contributing a recipe to one or the other is based on if the software is general purpose (conda-forge), or specific to biomedical research (bioconda). It is also possible to contribute conda recipes for other tools and software beyond Python projects, including those built with Rust, R, C/C++, Java/Scala, and beyond. This typically requires manually authoring a recipe and may be a subject of a later post.
Let’s walk through how to make recipes to add three pieces of software—defopt, sunbeamlib, and pybwa—to the conda-forge or bioconda channels. The first step for each is to create metadata stored in a meta.yaml, which we will generate with grayskull. We’ll examine differences with recipes in use and detail any manual changes that may need to made.
Adding defopt to conda-forge
defopt is a command line parsing library in python, similar to argparse or click. It is our preferred library for this purpose at Fulcrum Genomics at the time of writing. Let’s first install grayskull:
| conda create -n grayskull conda-forge::grayskull | |
| conda activate grayskull |
Next, lets run the pypi sub-command of grayskull passing defopt as the argument. This will trigger grayskull to generate a preliminary conda recipe file based on the package's metadata:
| grayskull pypi defopt |
This invocation will create the file defopt/meta.yaml containing your conda recipe.
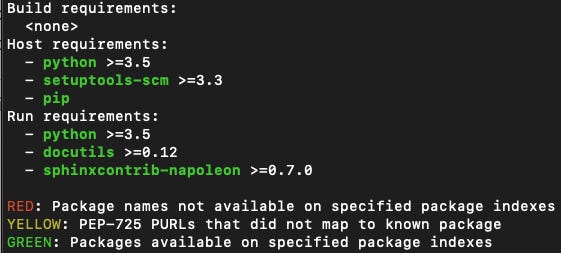
🚦When generating a recipe with grayskull, pay attention to the color of the requirements printed on the command line:
🔴 RED: these packages listed as requirements are not available on the specified package indexes (e.g. on
conda-forge, see the--packages-indexargument). You will need to create recipes for these requirements before you can proceed.🟡 YELLOW: external dependencies specified as PEP-725 PURLs do not map to known package. Either the packages do not have a conda recipe (similar to (1) above), or grayskull could not map the Package URL (PURL) to a conda package. For the former, add a new conda recipe for that package first, and for the latter, it’s probably best to add an issue to grayskull. Fortunately, it is quite rare to use this feature.
🟢 GREEN: these packages are available, woohoo!
See the relevant output from the terminal below below:
Comparing the recipe from conda-forge to the one generated from grayskull, there are only a few minor differences:
Grayskull adds
--no-deps --no-build-isolation, with the former ensuring that pip doesn’t install any new dependencies (they should be installed via conda), and the specifying that build requirements are already installed.Conda-forge uses the jinja templated value {{ python_min }} so that the minimum python version across all conda-forge can be maintained globally.
A few differences in dependencies: grayskull misses the addition of
colorama(for windows), grayskull omits setuptools since it’s already installed via setuptools-scm, and grayskull misses the typing_inspectas dependency (not sure why).
Adding sunbeam to bioconda
Next, we move on to reproducing of the recent addition of the sunbeam snakemake pipeline for metagenomic sequencing analysis. To ensure that dependencies of sunbeam are searched for in both the bioconda and conda-forge channels, we add the --package-indexes option, with the double-dash used to separate the end of that option and the name of the package for which to build a recipe:
| grayskull pypi --package-indexes bioconda conda-forge -- sunbeamlib |
And voila! There are a few minor differences between the recipe from bioconda and the recipe generated by grayskull, but the one to pay particular attention to is the addition of the run_exports specification in the build section:
| build: | |
| run_exports: | |
| - {{ pin_subpackage('myrecipe', max_pin="x") }} |
This ensures that the package is automatically pinned to a compatible version if it is used as a dependency in another recipe. The bioconda contributor documentation explains how to specify max_pin correctly. A grayskull feature request is open, but currently not on the roadmap.
Adding pybwa to bioconda
Next, lets look at pybwa, which contains python bindings for the popular bwa aligner. We generate the recipe with the following command:
| grayskull pypi --package-indexes bioconda conda-forge -- pybwa |
This is a great starting point for a recipe that saves time generating it by hand. Nonetheless, for recipes that aren’t pure python, in this case include C and cython, the automatically-generated recipe needs a few modifications. There are a few differences between the recipe from bioconda and the recipe generated by grayskull:
The source url on bioconda uses the GitHub tarball release, while grayskull uses the pypi. Either is fine, and likely the bioconda recipe was contributed prior to pypi releases (the author may have not known or used grayskull (hint: the author was me)).
The final bioconda recipe needs to define the path to the M4 macro processor for OSX arm64 builds.
The bioconda recipe has a number of additional build requirements, since this package needs to compile both the htslib and bwa C code (they are both git submodules in in the pybwa repository). In particular, defining a C compiler (via the {{ compiler('cxx') }} special macro) and GNU autotools.
A number of optional pybwa requirements are added to the recipe to enable support for a full set of features (e.g. the compression libraries used by htslib: libdeflate, libcurl, zlib, xz, bzip2).
The
dev_urlanddoc_urlin the about section are added and specify the source code URL and documentation URL respectively.The
additional-platformsin the extra section specifies support for linux aarch64 and osx arm64 specific platforms. Without this conda packages are not built for these platforms!A DOI (digital object identifier) helps for citing the work.
The process for contributing these new recipes
In all cases, some manual inspection is necessary to ensure the automatically generated recipes have what we need, and are tailored to the package index (channel) to which they’re being contributed. Nonetheless, most of the work authoring the recipes is done, and building the package with conda-build for conda-forge and bioconda-utils for bioconda is a good next step.
Finally, conda-forge and bioconda have different ways of organizing recipes, and different processes for submission.
Conda-forge uses a git repository per recipe. To submit a recipe to conda-forge you first must add it through a pull request to the conda-forge/staged-recipes repository. When merged, a new repository called a feedstock will be created in the conda-forge github organization, and build/upload of your package will be automatically triggered (e.g. see defopt’s feedstock).
Conversely bioconda uses a single git repository to house all the channel’s recipes. New recipes are added through pull requests into the single repository: bioconda/bioconda-recipes. Upon merge the package is automatically published into bioconda.
With these tools and examples in hand, you’re well on your way to becoming a true Master of the (Conda) Universe.
Fulcrum Genomics is a bioinformatics consulting firm built by scientists at the forefront of large-scale genomic research, with deep expertise in sequencing technology, pipeline engineering, and genomic data analysis for biotech, pharma, and academia. Engage us through project-based work, fractional R&D, or hourly consulting. Contact us to discuss your project.